Getting started with Python for sound
This is the first post in a series about generating and playing sounds using the Python programming language. The series will go slowly and cover several topics, including Python best practices, psychoacoustics, and digital audio. I assume no prior knowledge of any of these topics.
![]() Python logo. From Python.org.
Python logo. From Python.org.
To kick things off, I present my highly opinionated guide to getting started with Python for the purposes of sound synthesis. Readers already familiar with Python and its core concepts—packages, environments, and so on—may wish to skip to the next post, which actually gets down to the business of making sounds.
It’s probably worth mentioning right out the gate that I’m a Mac user. While most of the software mentioned on this page is available on all of the major platforms (Windows, Mac, and the many flavors of Linux), there are always small differences in the way the same application works on each of them. I’ve tried to anticipate these differences, but my experience with Windows and Linux is somewhat lacking because I don’t use them on a regular basis.
Get the code from GitHub
 Octocat, the GitHub mascot. From Johan Sundström.
My first piece of advice doesn’t actually involve Python. GitHub is an online service for hosting code, built on top of the popular version control software (VCS) Git. There are several similar alternative services, including BitBucket and GitLab, and the internet is replete with comparisons. GitHub is simply the one I tried first, and I haven’t found a good reason to switch.
This website is actually hosted in its own GitHub repository, which contains all the code examples I will present in this series. You can “fork” or “clone” this repo to obtain your own local copy using the buttons marked with arrows in the screenshot below.
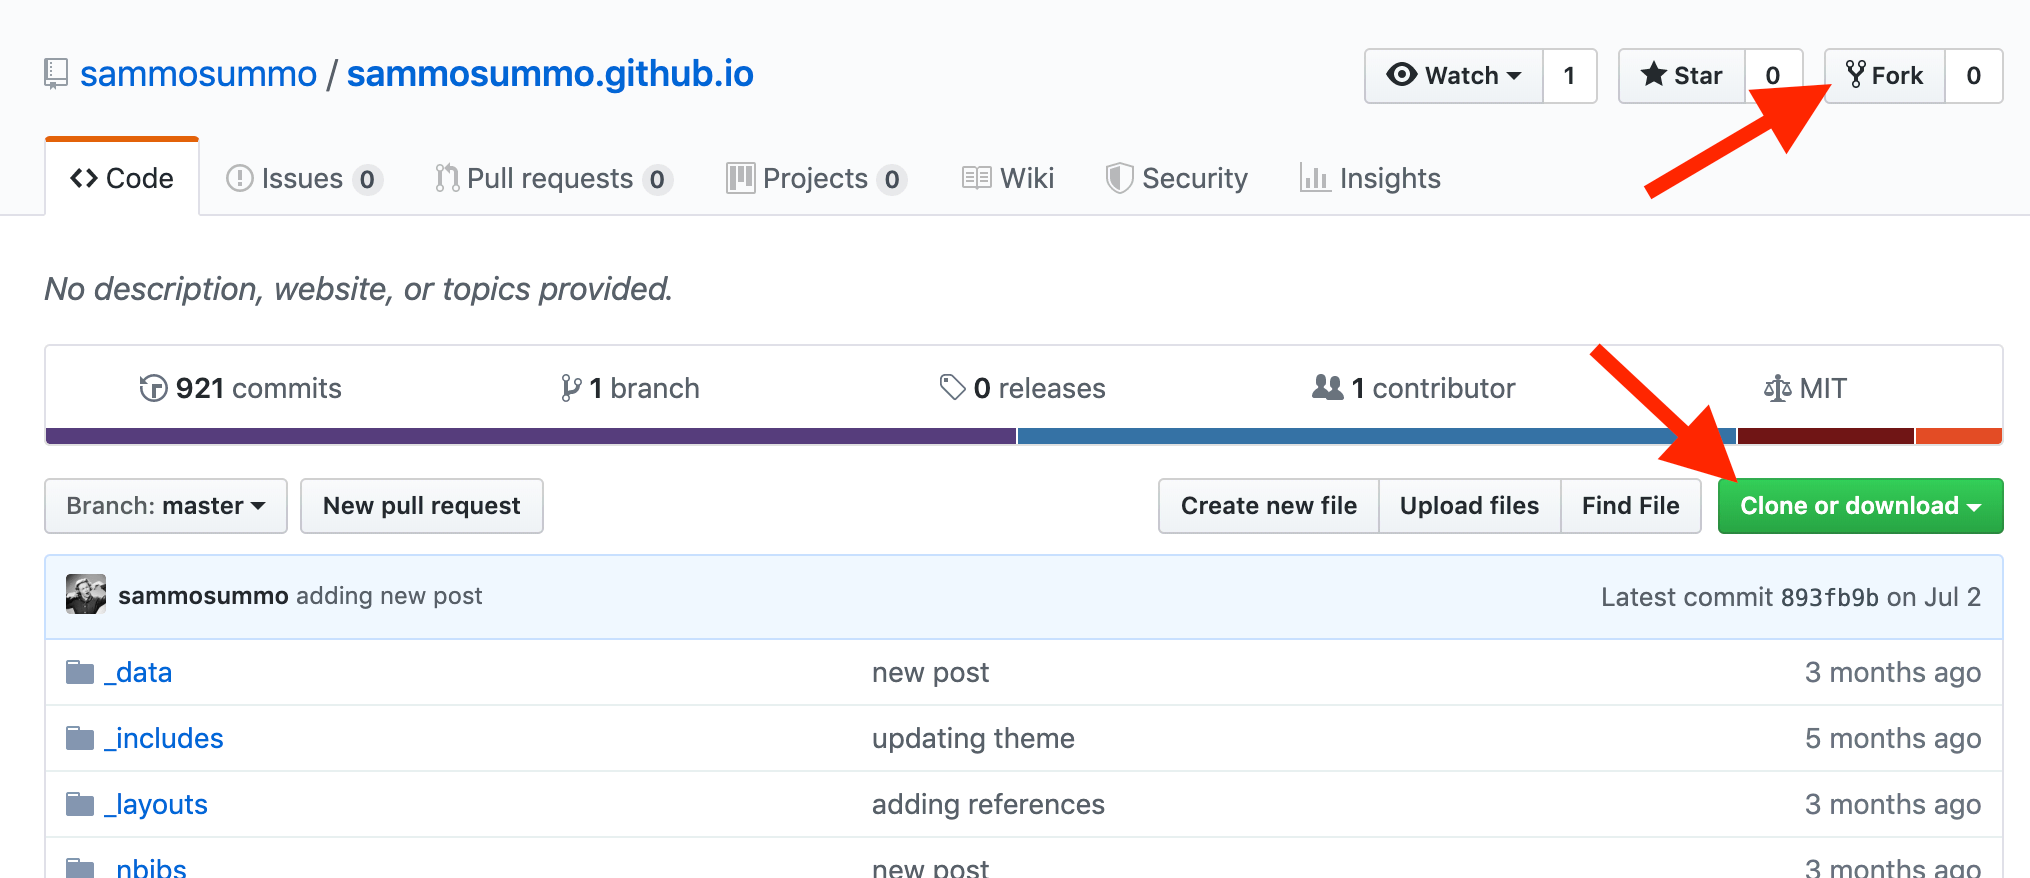 Click either the “Fork” or “Clone or download” button to create your own copy of the repo.
Install Git (if not using a Mac)
In order to follow my recommendations later on, you’ll need Git installed on your computer. Macs come with an old version of Git pre-installed, which you may update if you wish. Personally, I find this version to work just fine. If you are using Windows, however, you won’t have a pre-installed version so you’ll need to download and install Git. I’m not sure whether Git comes with Linux; I assume it depends on your distribution.
![]() The Git logo. From Wikimedia Commons.
The Git logo. From Wikimedia Commons.
Install conda and Python
Programming languages are either compiled or interpreted. Python is interpreted, meaning that it requires an interpreter to execute the code. There are many different ways to obtain a Python interpreter, but I strongly recommend using conda.
![]() Conda logo. From the conda docs. It annoys me that they didn’t make the white portions of the “C” transparent.
Conda logo. From the conda docs. It annoys me that they didn’t make the white portions of the “C” transparent.
Conda is software for managing installing and managing other software. It runs on Windows, macOS and Linux. In my opinion, conda is currently the best way to install Python for scientists and engineers. One of the primary advantages of conda over other approaches is that it installs everything in your local directory by default. This means that you never require administrator privileges, making it easy to use your own particular Python instances on multi-user computers or remote servers. For example, I sometimes use a relatively obscure Python package with numerous dependencies called HDDM. Typically it is not feasible to install HDDM on academic computing clusters using the Python interpreter(s) provided by the admins, so instead I just install a local Python interpreter into my user directory via conda. A potential disadvantage of conda is that it is maintained by a for-profit company called Anaconda, Inc., which means there is a possibility for them to change their business model in the future.
The most direct way to get conda is to download and install Miniconda, a software bundle containing just conda and its dependencies. Alternatively, you can use the “full-stack” Anaconda distribution, which includes conda, Python, R, over a thousand third-party packages and their dependencies. I prefer Miniconda because I will probably never use the majority of packages included in Anaconda, and those I do need can be installed easily later.
If you are on a Mac, an alternative approach to obtaining a Python interpreter is Homebrew. Homebrew is a package manager similar to conda. While I personally use Homebrew for other software, I don’t recommend it for Python because installing Hombrew to begin with requires administrator privileges.
A third approach is to download and install Python directly from the official website. This is fine but requires a little more work, since you’ll need to install at least one extra thing, pip, yourself. I’ll talk about pip again later.
Create a new environment
Environments—sometimes called virtual environments or simply envs—are separate instances of Python that are isolated from one another. You can modify Python within an environment without influencing other environments. To return to my earlier example, some time ago, HDDM only worked with out-of-date versions of NumPy. My (temporary) solution to this problem was to create an environment with NumPy rolled back to its earlier version. This allowed me to run my HDDM project within this environment without screwing up my other projects, which relied on the latest version of NumPy.
Python has multiple methods for creating environments; see here for a nice primer describing some of them. However, because environment management is one of the primary functions of conda, you should use this one, assuming you have followed my advice up to now.
I like to create a new conda environment for each new project. For instance, I have an environment called crackedbassoon that I use to run all code examples associated with this website. Environments are very easy to create from the command line:
conda update conda
conda create -n crackedbassoon
It’s good practice to check for a conda update each time you use it.
I recommend Mac users consider iTerm as a replacement for the built-in terminal tool, if they aren’t using it already. Windows users, if you installed Mini/Anaconda with the default configuration options, you won’t be able to access conda from the standard command prompt. Instead, you can use the Anaconda Prompt utility. Alternatively, if for whatever reason you have a burning desire to run conda from the command prompt, simply locate and execute \Scripts\activate.bat, which should be somewhere in your Mini/Anaconda installation directory.
Install NumPy
Conceivably, we could use nothing but the Python standard library for sound synthesis and playback, but this would require writing a huge amount of code. A better approach is to take advantage of third-party packages to perform as much of the heavy lifting as possible. For now, install one such package, NumPy. Others will be installed later, as and when required.
![]() NumPy logo. From NumPy.
NumPy logo. From NumPy.
NumPy is the foundational package for scientific Python, adding support for array-based computation. Without NumPy, creating and manipulating sound waveforms would be tedious and inefficient. Our code would be long and slow to run.
Conda can install packages into specific environments. The simplest way to do this is to activate the desired environment, then install the package without additional arguments:
conda activate crackedbassoon
conda install numpy
If you have been following my recommendations up to this point, and are using Miniconda, the above commands will install NumPy and all its dependencies for you. One of these dependencies is the Python interpreter itself. Therefore, the above might take a few minutes to complete.
Conda packages are curated by the Anaconda team. This means that a particular package might exist within the conda package repository, or that its latest version might not be available. Fortunately, conda also installs pip, Python’s de facto package manager, by default. Conda and pip generally play well together. When it comes to installing a new package, I recommend trying conda install <packagename> first, and if that fails, try pip install <packagename>. You can also use either method to remove packages.
Depending on the package, a little playing around with conda and pip might be necessary. For example, recently I wanted to use PyQt5, a set of Python bindings for Qt. While conda install pyqt installed the packages successfully, many of Qt’s features were actually missing (QtMultimedia, for instance). This was quickly remedied by installing a newer version of PyQt5 via pip install PyQt5.
Install PyCharm and configure
Writing code is facilitated enormously by an integrated development environment (IDE). Python ships with a bare-bones IDE called IDLE, which is OK for hello-worlding but is not suited to serious projects. Spyder is a popular powerful IDE, but my favorite is PyCharm. Like conda, PyCharm is made by a for-profit company, although its community edition is free and the professional edition can be obtained for free if you are in full-time education (you just need a .edu email address).
![]() PyCharm logo. From Wikimedia Commons.
PyCharm logo. From Wikimedia Commons.
PyCharm is awesome. It has highly sophisticated code introspection tools, a powerful debugger, and tight integration with VCS, including Git. I cannot emphasize strongly enough how convenient I find PyCharm’s Git integration. I hate dealing with Git directly from the terminal and PyCharm allows me to eschew this.
The unit of PyCharm is called a project, which is really just a directory containing your Python scripts. When you launch PyCharm for the first time, you will be presented with the option to Checkout from Version Control. Choose this, choose Git as your VCS—remember, Git must be installed for this to work! Enter your GitHub credentials, and select the sammosummo.github.io fork. PyCharm will then clone (download a copy of) the repository, and the files will be visible within the PyCharm window.
Before running or writing any code, you should change PyCharm’s settings. Most importantly, set the Python interpreter for the new project to be the crackedbassoon environment we created earlier. After scanning your environment, PyCharm may recognize that there are some missing dependencies based on the contents of requirments.txt and can attempt to install them for you (another nice PyCharm feature!), but its easy enough to do this yourself using conda and/or pip. Other settings I recommend but are entirely optional include changing the right-hand margin in the text editor to 88 characters (this is the value used by black, see later), using Google-style auto-completion for docstrings (again, see later), enabling Pycharm to expand main into boilerplate, and the darkula theme.
Install Audacity (optional)
Audacity has nothing to do with Python—it is software for manipulating digital audio. This series won’t require Audacity, but it may be useful for occasionally inspecting waveforms, spectrograms etc. of sounds you created. Audacity is free, small (at least compared GarageBand or Audition) and easy to use.
Learn Python
The Hitchiker’s Guide to Python provides a comprehensive list of the best resources for learning Python. If you are completely new to Python, you should go there and at the very least, work through one of these introductory tutorials. Since we’ll be using NumPy a great deal in this series, you should also try a NumPy tutorial, such as this one.
I also recommend reading the entire Python glossary from start to finish. The lion’s share of your Python knowledge will be learned while working on real projects and fixing real issues in your code. I’m not exaggerating when I say that almost every coding problem I have is solved by Googling it and finding that someone has posted almost the exact same thing on Stack Overflow. Knowing how to describe a problem using the correct terminology is key to efficient Googling/Stack Overflowing.
Make your code “Pythonic”
In Python, there is usually a preferred or Pythonic way of doing something. To quote the Zen of Python, “There should be one—and preferably only one—obvious way to do it.” This is worth keeping in mind as you write your own code. For example, try to stick to the style rules laid out in Python Enhancement Proposal 8 (PEP 8) (see also here) and try to use Python idioms wherever possible.
Of course, time spent ensuring code is Pythonic could be spent writing more code. I try to avoid wasting too much time on formatting and instead run all my scripts through black after they’re done. Black can be installed via pip, in your current environment if you wish.
Now code can be formatted directly from the terminal with black <mysript.py> (or black *.py to run it on all Python scripts in the current directory).
Write comprehensive documentation
Documenting your own code can feel like a chore but trust me, it is an incredibly beneficial habit in the long run and you should try to cultivate it straight away. Force yourself to document every script at the top level. Within each script, document all functions and methods of all classes (even __init__()!). Consider adding a comment to each line used to define an object unless it is absolutely 100% clear what the object does and how it will be used. Pick a pre-existing documentation style and stick to it—Google style is my personal favorite, but NumPy style is good too.
Make some sounds
Now that Python is installed and configured correctly, we can start to generate our first sounds. Continue to the next post.
Version history
- Originally posted February 13, 2019.
- Reformatted code blocks on March 16, 2019.
- Added links to second post on March 17, 2019.
- Edited writing and added images on March 28, 2019.
- Changed the repo on August 02, 2019.
Related posts
- “Ripple sounds,” Dec 12, 2019.
- “Equal-loudness contours,” Sep 21, 2019.
- “Playing pure tones with PyQt5 on Mac,” Jun 11, 2019.
- “New package “Brian hears” released,” Apr 09, 2019.
- All posts filed under hearing, python.